Most Revit users have at least heard of scope boxes and some have even implemented them on a design project. However, not many people have utilized scope boxes when doing BIM Coordination. You typically use scope boxes to define areas of a large project where you want to crop the view consistently over multiple views. For example, a project with a large footprint can employ scope boxes to ensure that the same extents are shown accurately on floor plans, finish plans, RCPs, and dimension plans. Scope boxes are created in plan view or RCP, but visible in all views and visible in other views if they intersect the view cut line. Scope boxes can be given names to easily identify them. There are a lot of really well documented sources on the web already, so we will skip over “All About Scope Boxes”.
So how can scope boxes be used for BIM Coordination? Since Revit 2019, scope boxes can be assigned to a 3D view which in turn can be exported to IFC or NWC for clash detection. Let’s walk through a typical BIM Coordinator’s workflow:
Step 1: Your subcontractors send you their models, not broken out by zone. It is encouraged that your subcontractors create 3D views based on their system (i.e. supply,return, chilled water, sanitary, etc.) so you can utilize their view filters in your model.
Step 2: Link all models into Revit (shared coordinates preferred), including those created in 3D CAD via generic model.
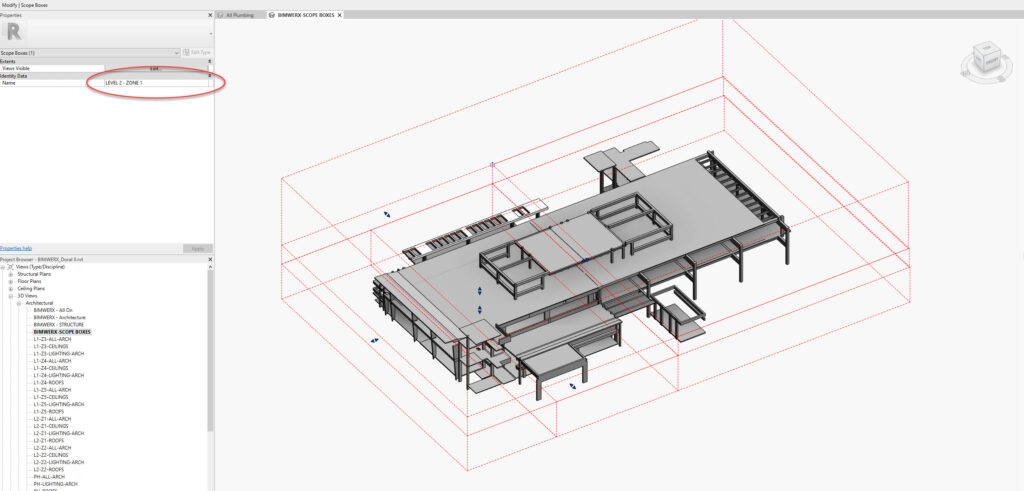
Step 3: Create a scope box for each zone in the project and be sure to name the scope box accordingly.
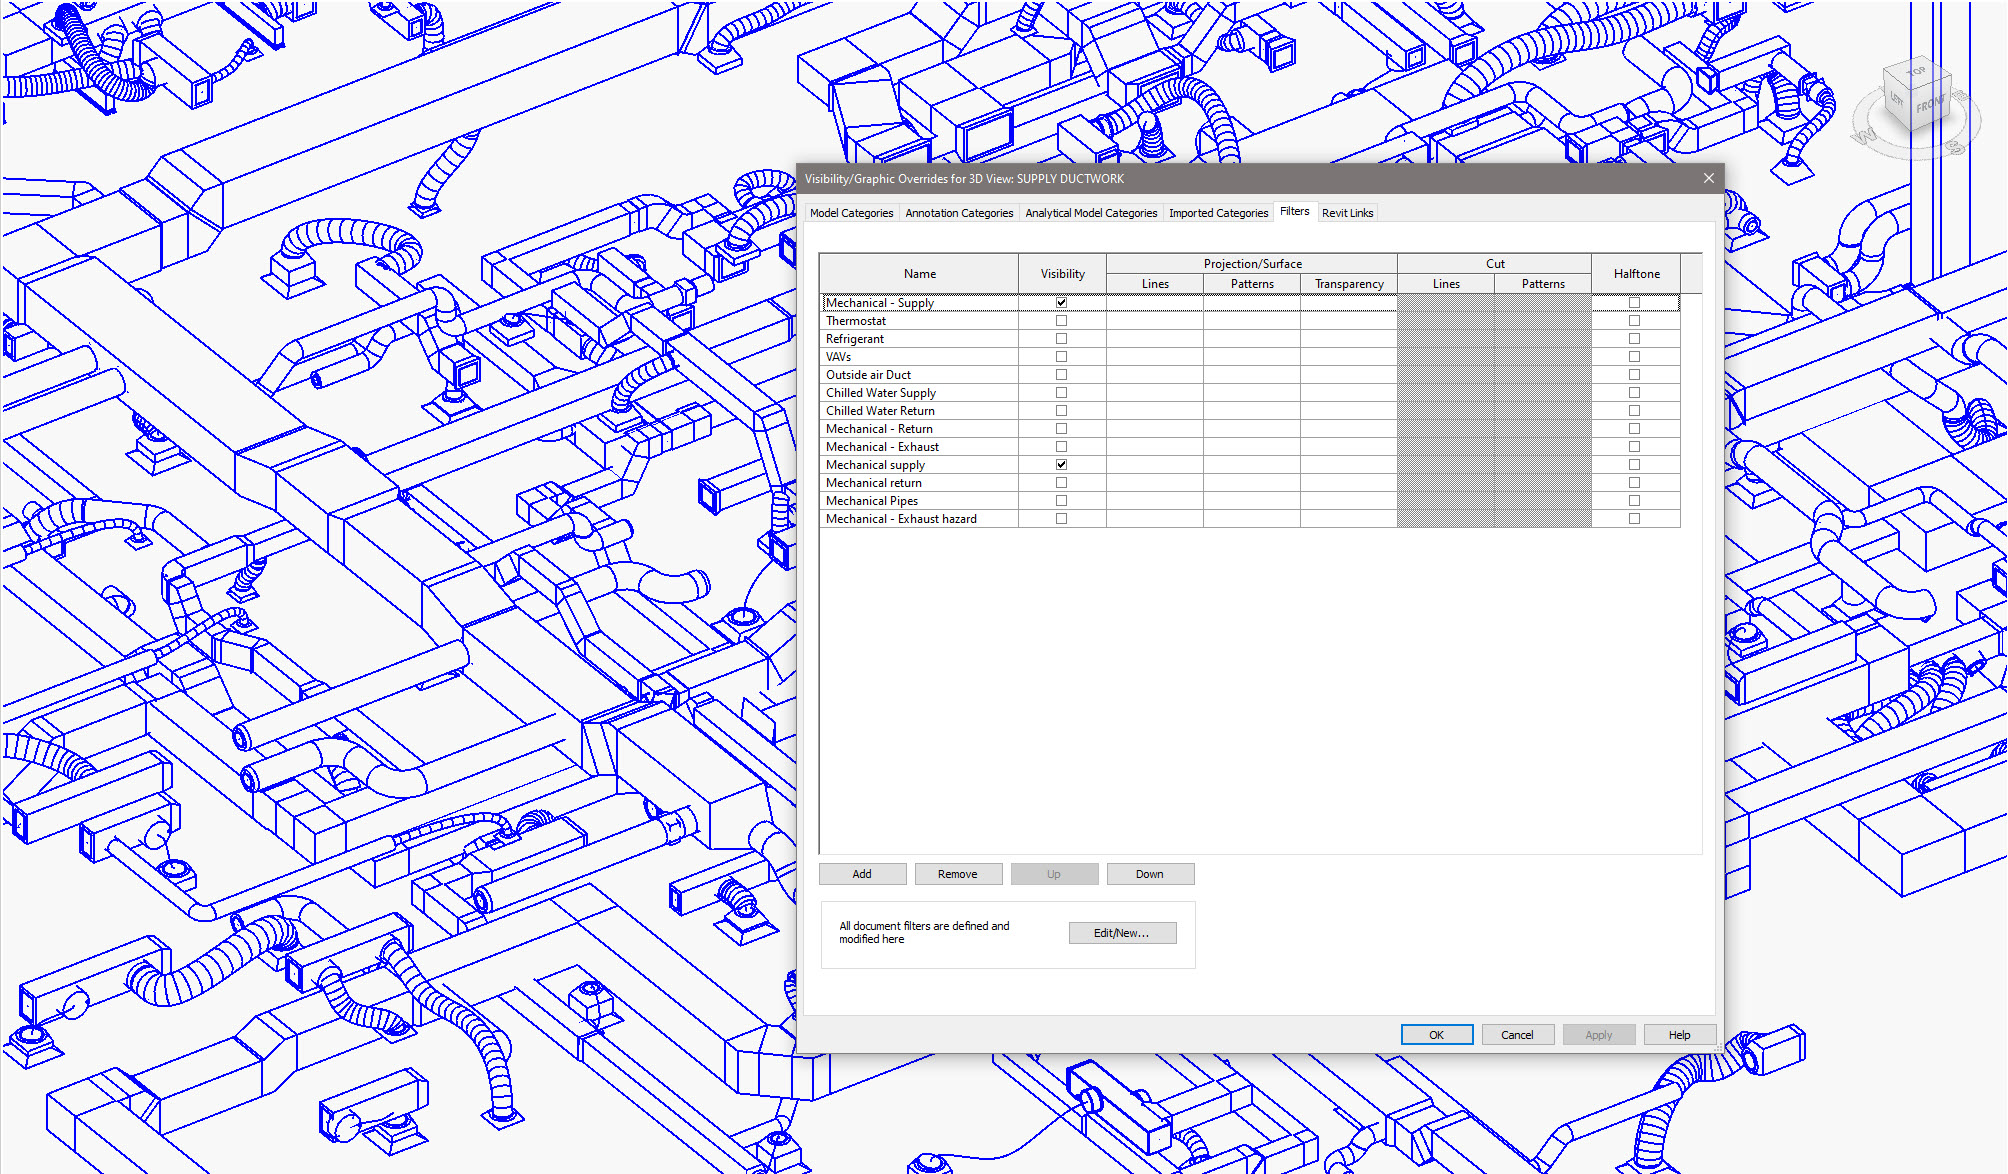
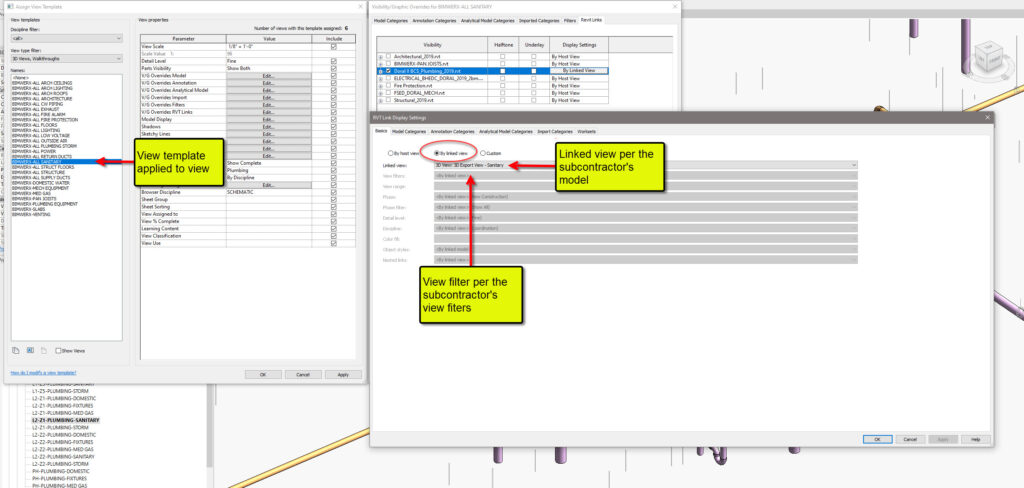
Step 4: Create individual 3D view templates for each trade and system and apply it to all 3D views you have created. Be sure to assign the correct scope box to the view template. Check that you are using the subcontractor’s 3D view and applicable filter in the view template.
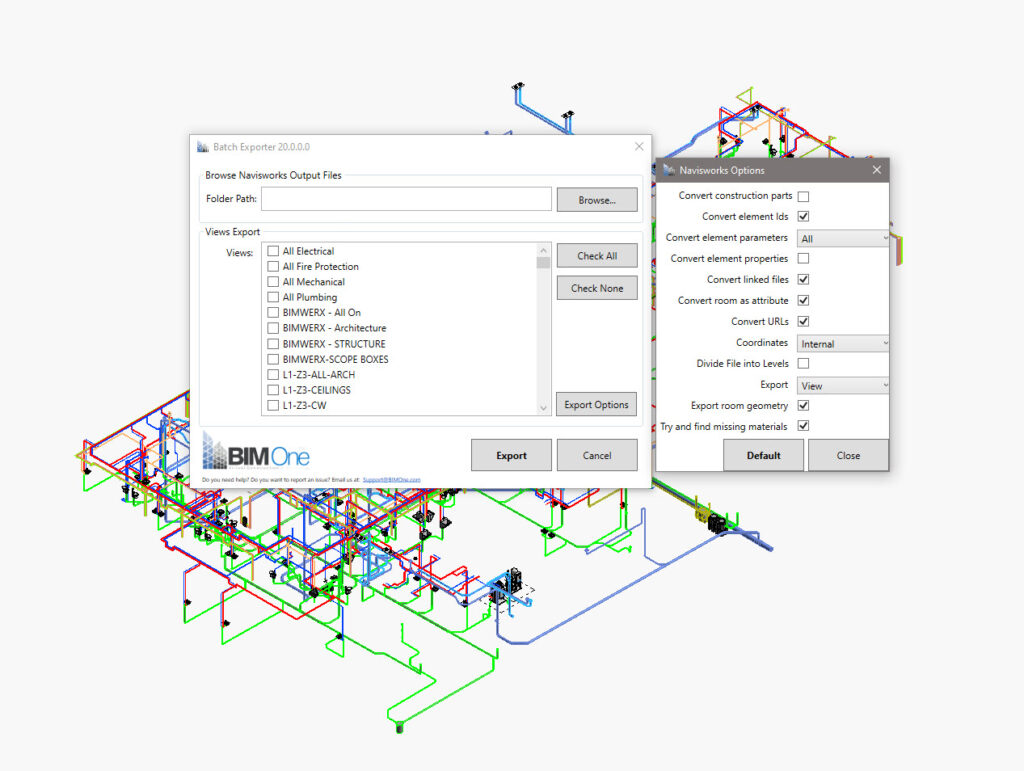
Step 5: Now you should have each subcontractor’s model split out by zone and system. In some cases, you could have multiple systems per zone, as mentioned in Step 1. If you have not already, visit our friends at www.bimone.com and download their add-in for Revit called NWC Batch Export.
Step 6: Select the appropriate export folder, options, and views you would like to export. Be sure to uncheck the box for “Export Room Geometry”, unless you want the Room volume to be exported for each space.
Step 7: Append your Navisworks model.
Hopefully this has given a little insight to how powerful scope boxes can be for getting your zones perfectly setup. Let us know your workflow. Do you use scope boxes? If you don’t do you think this workflow can help you?
In our experience of over forty (40) coordination projects under our belts, we have noticed an undeniable yet disturbing trend happening within the AEC industry that affects everyone involved. I am talking about the lack of coordination between the MEPFP engineers. To be clear, this is not to be misconstrued as a blanket statement of all engineers, but again a trend being seen throughout the industry. I am not naming names or calling out any firm here. The purpose of this article is to raise awareness with the fellow BIM coordinators and to provide little insight and direction into what we are doing to reduce risk.
Speaking from experience (we do a lot of work with architects and engineers) tight deadlines, reduced staff, scope changes at the last minute, and negotiated fees take a toll on the quality of a project- there is just not enough time or money to do proper QA/QC. Another culprit is that the person doing the QA/QC is usually a veteran of the AE world and doesn’t operate in the 3D environment. After-all, 2D documentation is contractually what is priced and built (more on that later). The engineers are trying to get the design figured out, routing in place, and calculations finalized, but its all happening so fast that often times the designer creating the models is not paying attention to the structure or other trades around them and architects are making sure their documentation is correct and drawings look accurate, expecting the internal coordination to be handled. To add insult to injury, most A&E firms do not take advantage of clash detection and 3D constructability reviews. Again, the budgets do not allow for the additional time and labor.
So, what can we do about this and how can we position ourselves as BIM coordinators and trade modelers?
Step 1: Identify the organization which created the models or designs. If they are known to not coordinate their work, then that sends up the first red flag. If they are in fact one of the repeat offenders, then assume you will be remodeling a lot of their work. Some companies add multipliers to their coordination and modeling fees when certain engineers design the projects.
Step 2: If you have the luxury of seeing the models prior to pricing your services, then bring the models into Navisworks or another coordination software and run a preliminary clash detection to see where you are starting from. Select a few of the random storm or sanitary pipes and check for slope on the pipe. If it is not there, then you will be remodeling the entire gravity system. Check domestic water pipes and supply ducts for insulation. If there is no insulation, you will be adding it to the entire model. Visually look for mechanical and plumbing clashes with structure. If they are easy to spot, then you can assume that the space you thought you had is a lot smaller. If you find any of these items to be true, you can assume that your real clash number is 25-40% higher. Unfortunately, most of us do not see those models ahead of time.
Step 3: Find the typical corridors and reference the ceiling heights, space allotment, duct sizes, pipe sizes for all trades, cable trays and conduits, etc. and see if they fit. Do not forget to account for insulation, hangers, and low points where structure may be crossing.
Step 4: Find the pinch point or convergent point where all trades are coming together. This could be corridor intersections, bathroom ceilings, mechanical rooms, etc. If you are already seeing problems in these areas your red flags should be flying.
How does lack of coordination affect BIM Coordination?
So now that you have done a thorough review of the documents and have a better understanding of the situation, how do you justify your fee to your client? Be upfront and honest. Show them the list of issues you are seeing and why these things are driving your price. Make them aware of anything missing that is not taken into account in the design models such as equipment clearances, cable tray, or light fixture clearances. Let your client understand that although you have received the MEP or FP model that only a percentage is reusable. In many cases, a complete remodel is in order, except for maybe the equipment. Be completely transparent about the BIM schedule and how it corresponds to the preliminary construction schedule. We have seen BIM coordination schedules explode due to the lack of coordination, at the average rate of 1.5 to 1.75 increase in time. Cover yourself for the sake of your company and the BIM Coordination industry. If you low-ball to get the work, you are doing a disservice to the aforementioned and chances are you will not devote the resources necessary to properly manage the project.
Correct support for med gas
What can design teams do about the lack of coordination taking place on their projects and how can they prepare for a fully integrated BIM?
Many construction industry professionals have cited MEP coordination as one of the most challenging tasks encountered in the delivery process for construction projects. There has always been the discussion of who is responsible for the building system coordination. The AE will cite “means and methods” and “design intent” and contractors will cite “AIA Document C401”. However, we need to fully understand and accept that building documentation is evolving and to reduce costs the information must be shared between design team and contractor. As BIM continues to become common place and more owners understand the importance of the progression of building data, it is not inconceivable that the model becomes part of the construction deliverable and not merely offered as a “convenience”. AE firms will need to employ 3D QA/QC into their workflows to combat the lack of design coordination. The firms not able to do this will utilize consultants to do this for them or engage in a Construction Management or Design Build contract approach where they can leverage the general contractor’s resources. According to the report “Design-Build Utilization” highlighted in an article by ConstructionDrive.com as of July 2018 design-bid-build is the most widely used delivery method in the US; however, by 2021 design-build will represent 44% of construction spending, especially now that various state legislation has allowed “alternative project delivery methods”.
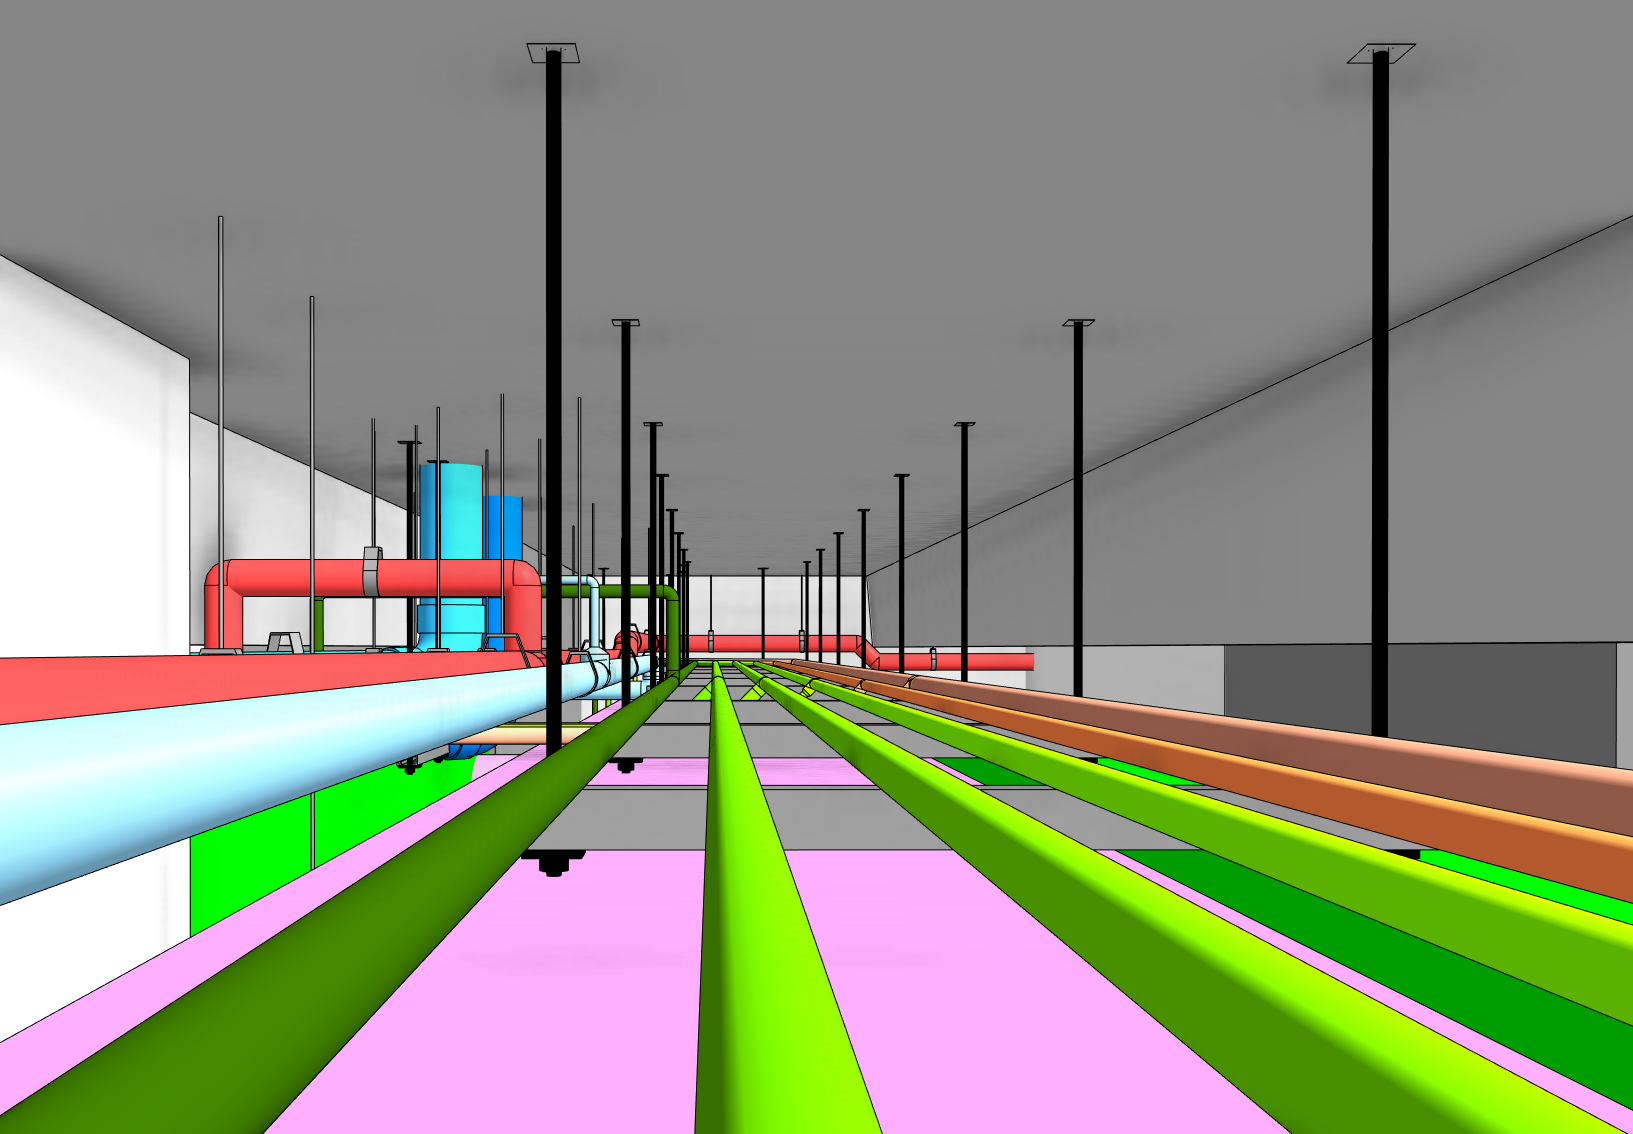
Are you a trade contractor using AutoCAD, Civil 3D, or any other AutoCAD based software to create you BIM coordination models? If so, did you know you can link the Navisworks NWD or NWC models directly into your model? Let’s take a look:
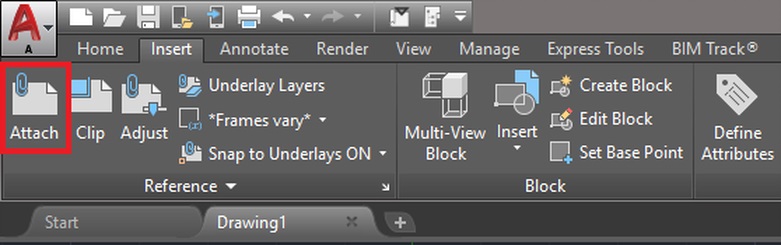
Open your AutoCAD based file and click on the “Insert” tab, and then click “Attach”
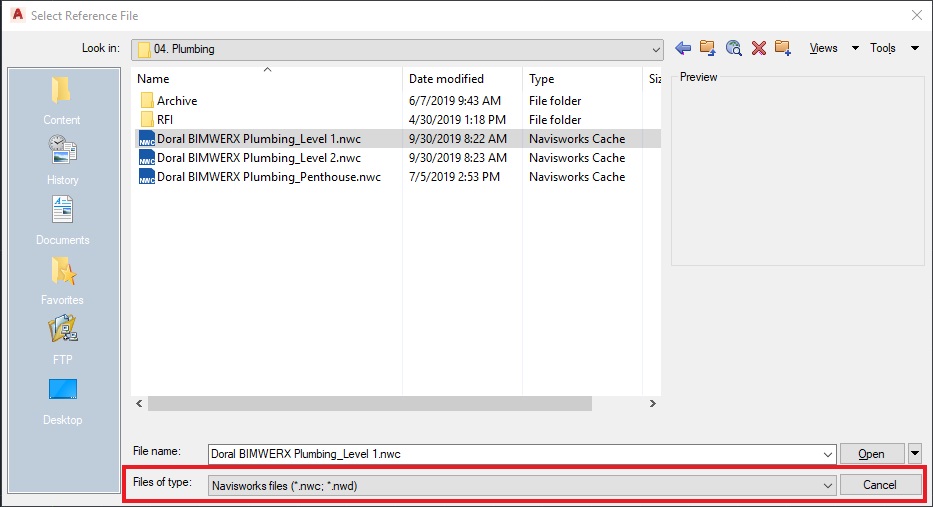
Now select the “Files of Type” drop down menu and change it to “Navisworks files”, and then navigate to the coordination model of your choosing, and click open.
Assuming you have created a model and aligned it with the rest of the team without moving it in Navisworks, the next step should work just fine.
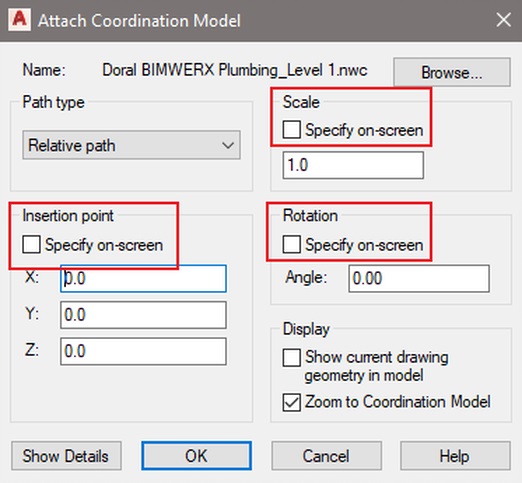
In the “Attach Coordination Model” dialog box, make sure the “Specify on-screen” box is NOT checked for the “Insertion point”, “Scale”, and “Rotation”. We want to be certain that we do not manipulate the model in any way when bringing it in to our AutoCAD environment. Click OK.
After the model is imported, you may notice something odd with the model. It’s really dim and hard to tell what you’re looking at. Some may even deem this unusable. Did you know there are two commands that you can type into the command prompt that will allow you to adjust the display of the model? Take note AutoDesk. You may want to add a button for this one.
In the command prompt, type “CMFADECOLOR”. The default value is 60. Try setting this to 0.
Now, that’s a bit better. But lets try one more command to really get it to pop.
In the command prompt, type “CMFADEOPACITY”. The default value is 40. Try setting this to 0 as well. Viola!
I hope this helps you in your journeys to come. Let me know if this helped you.
What can $875 million in cash buy you? How about one of the best construction software companies in the world, PlanGrid . Some may think this is a good thing since Autodesk certainly has the ability to reach millions upon millions of AEC professionals and this will help the construction software monopoly reach their unstated goal; “To be the one and only AEC software in the world”.
Looking back at the history of Autodesk acquisitions, including one of its first in Lightscape (arguably the best rendering software of its time), Softdesk, Discreet, Softimage and Buzzsaw, one has to wonder the fate of their new acquisitions. All of these products were stripped away, and inserted into their other products and never heard from again. However, then there are products like Revit and Navisworks whose purchase actually elevated the software and changed the state of design and construction as we know it, were truly fantastic purchases. How about Autodesk’s purchase of Assemble Systems back in July? It is still too early to tell just how it be integrated into their BIM 360 family of products, but I get a little nervous when I see two purchases like these so close together.
Getting back to PlanGrid, the beauty of the software was that it did not rely on any other software. It was purely cloud-based with a portal via its apps. You didn’t have to know, CAD, Revit, Navisworks, or any other software. Given the infrastructure required to host and operate day-to-day and project-to-project tasks, it will be interesting to see how this will be implemented. The real question one has to ask is, “which Autodesk package will the PlanGrid belong to”? Will it be the BIM 360 family of SAS or will it become a piece of the relatively newly rolled out AEC Collection? Only time will tell.
While on the topic of acquisitions, I believe BIM Track will be one of the next acquisitions of Autodesk, which will truly break my heart. You see, companies like Assemble Systems, PlanGrid, and BIM Track rely heavily on customer interaction, around the clock technical support (with a human), and people that truly want to create the best possible software they can. And they do that by listening to their client-base. Something gets lost when smaller companies are bought by the big boys. People seem to stop caring about the customer. Autodesk is notorious for poor customer support, terrible support, and my favorite; “try reinstalling the software”.
Let me know how you feel about the latest acquisition!
The #VRWERX recently released a video on YouTube that illustrates how we are revolutionizing the homebuying experience. Home building has skyrocketed over the last few years and we at The Werx Company has realized that there is really nothing setting the competition apart from each other. We have focused over 18 months of research and development to one goal; offer homebuilders turnkey technology-based solutions that turn the conventional and mundane homebuying experience on its head. Here is how we do it:
Step 1: Build a 3D virtual model of your community
Step 2: Build photorealistic model of your homes inside and out, in virtual reality
Step 3: Build in whatever customization you want your homebuyer to have
Step 4: Customize your sale center with our proprietary hardware (AKA The WerxNest)
Step 5: Provide turnkey systems integration services, including training of personnel as well as onsite and offsite support
Step 6: Engage potential homebuyers in your sales center as you normally do
Step 7: Prospective buyers tour the model homes with tablet in hand and our proprietary software, customizing the model homes with options as they desire
Step 8: Sync the customizations to the cloud or customize their home and lot on the WerxNest
Step 9: Potential homebuyer experiences their customizations either in the VR headset or on the large format TV.
Step 10: Link of their customized homebuying experience is sent via secured link directly to the potential homebuyer with the ability to share directly from their social media accounts.
As a biproduct, we can produce all your marketing material for you including 2D Floor Plans, colored elevations, Renderings, Animations, Print Advertisements, Website, and Drone Footage.
So what are you waiting for. Reach out to our team for more information.
The marketing team at the software companies are out to do one thing and one thing only; to sell their products to you the buyer. I admit I was sucked into the glamor and pizzazz of BIM, more specifically Revit. Back in 2008 and 2009, the economy had begun its downward spiral and in the design and construction industry it was more like a nosedive. Everyone was fearful of losing their job and the prospects for the next twelve to eighteen months did not look good. At this point in my career, I was working at an architectural firm and trying my best to find ways not only get projects in the office, but keep my job at the company that I had worked so hard for in the previous years.
A small group of us had heard about this wonderful software called Revit. To be honest, we thought BIM was Revit and Revit was BIM. I will get into that a little later. We approached the partners at the firm and pitched the idea of trying out a few pieces of software over the next few weeks and even have the product representatives give us a demonstration beforehand. We looked at both Revit and ArchiCAD and ultimately decided on Revit – for reasons that I will not cover in this post. We absolutely fell in love with the amazing things that it could do.
You know what I am talking about – A change here equals a change everywhere; fully coordinated documents without lifting a finger; building section cuts just because we could; 3D views on the fly; scheduling of anything and everything. It promises better coordination, faster production time, less personnel on the project and my personal favorite content from the manufacturers. Needless to say, everyone at the table was in awe. Well, almost everyone. There were a few seasoned individuals who could not stand the fact that this software appeared to do everything desired. They tried to find the loopholes in the project being shown…but couldn’t.
They came up with every scenario – can you do this, can you do that, etc. You see, many of the salespeople at these software companies are well polished. They can answer every question you have, they can manipulate the models and documents to make it seem like everything is seamless. What you have to realize is that they spend hundreds of hours creating the model(s) of the project that they show.
Everything is preset and looks amazing. They even speak the lingo of the AEC community and have the antidotal stories to go along with the examples. Alas, they left us with trial software and their business cards. We of course hit the ground running. We went through every online tutorial and every manual we could get our hands on, after-hours of course. What we quickly found was that there are ways to do things and ways not to do things. We found that when you throw a bunch of people into a project that don’t know what they are doing then you are all but assured disaster. We also figured out that all the training in the world will not be a substitute for actual use.
We could not retain what we learned unless we applied it to an actual project. A significant issue we ran into was the hardware requirements for running the software. The product reps ensured us that the software would run on our CAD stations. Wrong! Oh it did at first, well until the project reached a significant size. On the positive side, we came away with valuable insight: How to roll out BIM in the most effective manner; What project type, budget and size is best for a pilot BIM project; How to pick the people for the pilot project; What kind of person is best suited for being the BIM Manager, in order to be able to have any kind of chance at success with BIM.
All of these things that took us many months and projects to figure out are about to be shared with you in the upcoming posts.
Thank you for stopping by the blog. From time to time we will be posting various topics here dealing with BIM, software, hardware, industry trends, and other subjects and concepts dealing with Building Information Modeling. Some posts will be links to other blogs or websites that cover the topic of discussion. We do not need to reinvent the wheel by giving independent reviews of software or post benchmarks of new hardware because there are entire websites devoted to this. It is our goal to be your one-stop-shop for information. Pure and simple. Whether you are a seasoned veteran of the BIM process or you are completely new, we will have something for you.